previous <<==>> next
FIELD MULTIMETER
» SIMPSON-260 ( Series 5 ) «
VOLT-OHM-MILLIAMMETER

Dimension  ( Body = W x H x D )   5_1/2" x 7" x 3_1/2"  / 14 cm x 18 cm x 9 cm

FIELD  MULTIMETER  » 260 ( Series 5 ) «   SIMPSON, Chicago, Ill. / USA  (1969)
******************************************************************************

250 mV DC ;  2.5 V .. 5000 V  DC/AC ;   50 μA .. 10 A  DC ;   -20 dB .. +50 dB
                    (x1) .. 2 kΩ ;     (x100) .. 200 kΩ ;     (x10k) .. 20 MΩ

BATTERIES:       0 .. 200 kΩ     with  1 x 1.5 Volt   D-Type
                   ..  20 MΩ     with  4 x 1.5 Volt  AA-Type

SIMPSON-260 ( Series 5 ) DIAGRAM ...
|

The MANUAL ( with the WIRE-DIAGRAM ) can be downloaded from ...
http://www.simpson260.com/downloads/downloads.html
R E M A R K S :
------------------------------------------------------------------------------
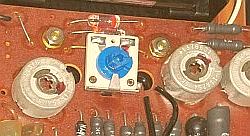
This "American Classic" was found in a RoadSide JunkStore on PacificHighWay.
The old batteries were "exploded". After clean-up the mass, nothing works ...
The FUSE-HOLDER was loose and now fixed with a "Helix-Wire" to be flexible. As
usual, "Cold SolderingPoints" where found. After replacing dead R-10 (= 45 k )
by the parallel pair ( 50 k || 500 k ), DC was working, but OHM-Range was not.
The burned R-16 & R-1 had to be replaced by selected one (= 11.2 ) or by a
series of 3 resistors (= 1138 *). Now the OHM-Range was working again. Finaly
the AC-RANGE: It showed much TOO LOW values! One of the Germanium-Diode-Pair
( 2 x 1N87, Glass w. red marks ) showed a too high reverse current ...
|
 Because these diodes are not longer available, I experimented - and decided to
replace both with a pair of SCHOTTKY-Diodes ( HP5082-2800 **). BUT NOT ENOUGH:
The aged R-26 had to be replaced to match the value (= 7.5 k ). Now AC worked.
I used the 1.5 Volt-Battery to re-calibrate the AC-Range with R-28 & R-31
TRIMMERS. It is an ITERATIVE PROCEDURE: Changing the battery's polarity, the
instrument has to show the same value!
Because these diodes are not longer available, I experimented - and decided to
replace both with a pair of SCHOTTKY-Diodes ( HP5082-2800 **). BUT NOT ENOUGH:
The aged R-26 had to be replaced to match the value (= 7.5 k ). Now AC worked.
I used the 1.5 Volt-Battery to re-calibrate the AC-Range with R-28 & R-31
TRIMMERS. It is an ITERATIVE PROCEDURE: Changing the battery's polarity, the
instrument has to show the same value!
 HOW TO GET ACCESS TO THE SOLDERING-SIDE OF THE PRINT-BOARD:
==============================================================================
o Pop-Up the ZERO OHMS KNOB with a knife
o Unscrew the back side ( with a long screwdriver )
o Remove the D-Battery; pop-up the D-Contacts
o Remove the 2 nuts & 2 screws holding the board
o LIFT THE BOARD ...
The Central-Axle & the -DC/+DC/AC-Axle stay in the case !!!
-----------------
(*) Replacements are RESISTORS I had "on board" from the '60s - Selected with
my
HOW TO GET ACCESS TO THE SOLDERING-SIDE OF THE PRINT-BOARD:
==============================================================================
o Pop-Up the ZERO OHMS KNOB with a knife
o Unscrew the back side ( with a long screwdriver )
o Remove the D-Battery; pop-up the D-Contacts
o Remove the 2 nuts & 2 screws holding the board
o LIFT THE BOARD ...
The Central-Axle & the -DC/+DC/AC-Axle stay in the case !!!
-----------------
(*) Replacements are RESISTORS I had "on board" from the '60s - Selected with
my