previous <<==>> next
RESULTA-P7 with Printer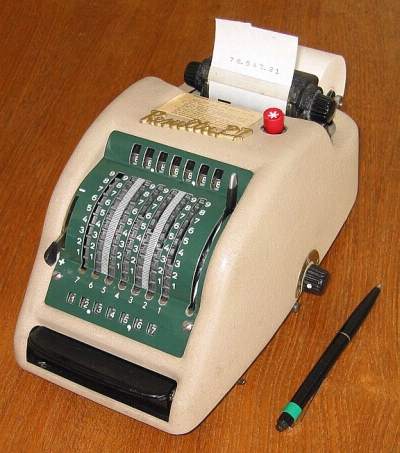 An old PEN is used as a STYLUS Have a look INSIDE THE RESULTA-P7 Have a look at the RESULTA-P9 w.Printer |
TECHNICAL DATA of the Mechanical Printing-Calculator RESULTA-P7
*****************************************************************
7/7
Dimensions: (ca.) Width = 6_1/4" / 16 cm
Depth = 11_3/4" / 30 cm
Height = 5 " / 13 cm
Weight: (ca.) 8 lbs / 3.7 kg
Mechanics: Setable Counter with Input Display
Black Nylon Ribbon (= Typewriter):
1/2" * 30' / 13 mm * 10 m
Paper Roll (Standard):
2 1/4" * 2 3/4" * 165' (W * D * L)
57 mm * 65 mm * 50 m (B * D * L)
Functions: Add, Subtract
Registers: Input = 7 Decimals
Input-Display = 7 Decimals
Arithmetic = 7 Decimals
Manufacturer:
Paul Bruening
Berlin
West Germany
1967
H O W T O U S E the RESULTA-P7
**************************************
CLEAR THE ARITHMETIC UNIT:
--------------------------
Make sure the left vertical lever on front is set to (+) ADDITION.
If not, push it to the right to release the lock and move it from
(-) to (+). Clear the arithmetic unit by pulling down the lever
on the right.
ENTER A NUMBER:
---------------
Use a pen and pull-down the appropriate number. Depending of the
left vertical lever on front, the input is (+) ADDED or (-)
SUBTRACTED. The result is visible in the arithmetic unit behind
the top window.
INPUT CHECK:
------------
When the black knob on the right side is set to the middle (0),
the input will stay and show the number entered in the lower
display. Before entering a new number, press the bar on front to
release the input segments. If the black knob on the right side is
set clockwise to (X), the release bar is locked down and each input
segment snaps back immediately after entering a number.
NEGATIVE RESULTS:
-----------------
Negative results are displayed in the arithmetic unit as the
COMPLEMENT of the next higher 10, 100, 1000, ...
Example: -12 = 9...988
PRINTING THE INPUT:
-------------------
Only the number staying in the input device (see INPUT CHECK)
can be printed. Set the black knob on the right side counter
clockwise to (P). Hit the release bar on front and hold it down
until the printing is done together with clearing the input.
PRINTING THE TOTAL:
-------------------
Since only the number staying in the input device can be printed,
it is necessary to RE-ENTER THE TOTAL: Set the left lever to (-)
SUBTRACTION. Press the red key (*) on top. Pull each column of
figures down until the sum (seen behind the top window) will
become 00...00. The total comes in the lower display. Set the
left lever back to (+). Now the number is ready to be printed...
CHANGING THE PAPER ROLL:
************************
o Turn the paper knobs backward.
o Pull out the axle of the paper roll.
o Put in the new paper roll so that the paper end comes from the
top and goes under the axle in the middle and up again
(s.REM: This gives right friction to hold the spool in shape).
o Lift the paper feeder, push the paper end into the rear slot
and turn the paper knobs clockwise.
o Feed the paper and adjust it.
o Tighten the paper roll.
CHANGING THE RIBBON:
********************
o Remove the cover by pressing simultaniously the right and left
release buttons on the bottom.
o Observe how the ribbon is spooled:
LEFT = counter-clockwise, RIGHT = clockwise !!!
LEFT SPOOL is ACTIVE, the RIGHT SPOOL is PASSIVE !!!
o Change the ribbon.
o Replace the cover.
R E M A R K S TO R E S T O R A T I O N :
=================================================================
(1) The clearing lever was broken and repaired with an aluminum
handle: The new & old piece are held together with component
glue, enhanced with a piece of cat food can on each side.
(2) The FEET were detoriated and must be replaced with new ones.
(3) The calculator was found without paper axle and fastener. The
axle is home-made of an aluminum tube, screw-axle and nuts.
The paper fastener is home-made of brass wire ...
|
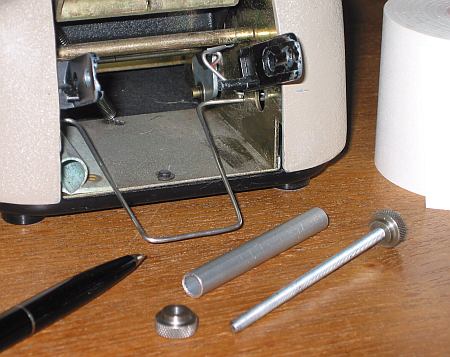 ... On the back side is a build-in holder for the pen.
(4) "67" = 1967 = PRODUCTION-Code is scratched in the bottom.
... On the back side is a build-in holder for the pen.
(4) "67" = 1967 = PRODUCTION-Code is scratched in the bottom.