previous <<==>> next
FACIT EK
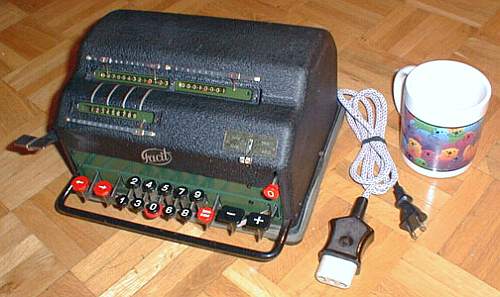
Have a Look at the "Manual Precursor", the FACIT-T (= Advertisement ) Have a look at the HOME-MADE A N G L E POWER PLUG for 220 VAC ... The broken black ZERO-Key got a RED RING for stability with purpose: Because out of sequence, this RED enhances its special position TECHNICAL DATA of the Electro-Mechanical Calculator FACIT EK ************************************************************************** (Plate missing!) Serial Number: 8782 (= Engraving on bottom) Dimensions: (ca.) Width = 11 " / 28 cm Depth = 9_1/2" / 24 cm Height = 6_1/4" / 16 cm Weight: (ca.) 22 lbs / 10 kg Power Supply: 115 V / 20 W ( AC / DC ) Mechanics: 10-Keyboard (DALTON type) Serial-to-parallel conversion with Principle: Pin-Wheel / Sprossenrad Special: FACIT's Solution Functions: Add, Subtract, Multiply, Divide Registers: I Input = 9 Decimals II Counter = 8 Decimals III Arithmetic = 13 Decimals Manufacturer: FACIT Atvidaberg Sweden 1940 BASICS & HOW TO USE the FACIT EK *********************************** (A) Clearing Registers: ----------------------- The LEVER-PAIR on the left side is for clearing registers (III)&(II) per hand. The input unit (I) will be RESET & CLEARED by MOTOR POWER in pushing the right RED [0] BUTTON. After this clearing cycle the input keys [0], [1], ... [9] are enabled. (B) Shifting the Input Unit with the Entered Number: ---------------------------------------------------- Left of the number keys, the RED KEY-PAIR let the input unit STEP left [<-] or right [->]. The actual position is marked with a red arrow-pair ref. to reg. (III) & (II). Right of the number keys, the RED [DIV] KEY let the input unit JUMP to the most left position - but the arrow-pair stops at pos. 8 of the counter - and the input will be filled up with zeros. (C) Counting Direction: ----------------------- After clearing the counter unit (II), it depends of the first ADD/SUB operation, that the counter will go either (+) or (-). In case of (+) the counter & arithmetic unit are working in the same; in case of (-) both are working in opposite direction. This is shown with a RED INDICATOR at the right of the counter unit. (D) The Toggle Lever on top has 2 Positions: -------------------------------------------- up = Input register is NOT CLEARED after each DIV/MULT cycle. down = Input register is CLEARED after each SUB/ADD cycle. (E) Functions: -------------- The MINUS [-] & PLUS [+] keys are MOTOR POWERED. + = Add Addend + Addend = Sum - = Subtract Minuend - Subtrahend = Difference x = Multiply Multiplicand x Multiplicator = Product : = Divide Dividend : Divisor = Quotient Prior to each task the 3 REGISTERS (I), (II), (III) have to be CLEARED. ADDITION & SUBTRACTION: ======================= Example: 123 + 45 - 6 = 162 Set the toggle lever to SUB/ADD. ADD: Enter the first number (123) into input register (I). Press the PLUS [+] key to transfer the input (I) into arithmetic unit (III). The counting unit (II) displays the figure 1. Enter the second number (45). Press the PLUS [+] key to add the number. The arithmetic unit (III) displays the intermediate sum (168) and the counting unit (II) displays the figure 2. SUBTRACT: Enter the third number (6) into input unit (I) and press the MINUS [-] key. The arithmetic unit (III) displays the result (162) and the counting unit (II) is decreased by 1. REMARK: NEGATIVE RESULTS are displayed in the arithmetic unit (III) as the COMPLEMENT of the next higher 10, 100, 1000, ... Example: -12 = 99...9988 MULTIPLICATION: =============== Example: 123 x 45 = 5535 Set the toggle lever to DIV/MULT. Enter the multiplicand (123) into input unit. Press the PLUS [+] key, until the second figure of multiplicator (5) will appear in the 1st position of counter unit. Move the input unit with the STEP [<-] key to position 2. Repeat pressing the PLUS [+] key until the first figure of the multiplicator (4) appears in the 2nd position of the counter unit. The multiplication is done: The multiplicand (123) stays in the input unit, the multiplicator (45) is in the counter and the result (5535) is in the arithmetic unit. DIVISION: ========= Example: 22 : 7 = 3.1428571 Remainder 3 Set the toggle lever to DIV/MULT. Division requires 3 steps: (A) To Set the Dividend into Arithmetic Unit: ----------------------------------------- Enter the dividend (22) into input unit. Press the JUMP [DIV] key. Press the PLUS [+] key to transfer the input into arithmetic unit. (B) To Set the Divisor into Input Unit: ----------------------------------- Clear the counter unit. Clear & reset input unit with the red (0) button. Enter the divisor (07) into input. Press the JUMP [DIV]) key. (C) To Divide: ---------- Press the MINUS [-] key (now the red indicator is on) until the machine stops because "underflow". Make one PLUS cycle. Move the input unit with the STEP [->] key one position to the right. Press the MINUS [-] key again ... and repeat this procedure until the required number of decimals are calculated... The result (3.1428571) is in the counter unit, and the remainder (3) is in the arithmetic unit. The divisor (7) stays in the input unit, therefore an additional decimal can be estimated... ( 4, cause 4 x 7 = 28). Have a look at "Calculating Trickies" ... impressum: ************************************************************************** © C.HAMANN http://public.BHT-Berlin.de/hamann 08/27/07 |